Quantcast
Channel: Sugar Sweet Cakes and Treats » Blog
Viewing all 46 articles
Browse latest View live

Lalaloopsy Cake & Cake Pops

$
0
0
Where have I been?  It's been a long while since I last posted anything but I've been so busy and have been staying away from cake stuff for the past couple of months to just get caught up with life and everything going on with it.  At least for now, I'm back and I've been missing it for way too long.


Do you know a Lalaloopsy?  Hah-hah, I have gotten to know these dolls really well over the past few weeks.  They are everywhere and all the little girls are talking about them and collecting the dolls!  Even my 4 year old has a long list of the ones she wants!

This cake was made for my 9 year old niece Kayla who had a garden themed Lalaloopsy party this past Sunday.  And she has over a dozen of them in her collection.  It was so cute seeing her name each of the cake pops and getting excited with each one =)


I must admit, these little gals, after all the trouble I ran into creating them, turned out super cute =)

I've never been a big fan of cake pops.  They're mashed up cake that is just too sweet with the chocolate coating for my taste but the kids go crazy over them and they never last long at any party.  So, determined to make a cake pop that I could enjoy eating too, I bought the Nordic Ware Cake Pops Pan.  LOVE IT!  I want go buy a few more of these.  One pan is not enough.
And, one of my gifts from my cousin and her husband (they just got married a little over a week ago), were 2 sets of the Silicone Cake Pop Trays.  They didn't work that great (sorry Steph and Sean) but I'm gonna give them another try with other recipes before I give up on them - And, I'll be sharing with you all about their wonderful wedding and the cake I made for them really soon too.


I tried using a scratch chocolate cake recipe to make the balls but the batter doesn't rise much and I ended up with ovals that we gobbled up right off the pan as they were cooling - it was too easy to just pop one of these things in your mouth...and another...and yet another...well, they didn't last long.

(I also had made some banana bread and had a little bit of batter left over from the loaf pan and made some cake balls with them and wow, those were gone fast!)

So, for the Cake Pops, I made them using a box mix, sub milk for water, and add an extra egg - read it on a couple places on the web that suggested it with using cake ball pans.  The result....

Chocolate cake baked in the cake pop pans - metal pan (right) and silicone tray (left)
These were baked in the Silicone Cake Ball Tray - the middle of the cakes grew pushing the tray up in the middle which resulted in a thick ring of cake around the edges.  They didn't do so well when I tried to dip them since they weren't firm and had too many air pockets on the top half of the spheres.
These were baked in the Nordic Ware Cake Ball pan.  Much, much better.  The metal pans are tightly clamped so there wasn't much excess around the middle - just a thin bit that I trimmed off with a pair of kitchen shears.  The balls were really nice, firm, smooth and round.  So much better and easier to dip into the chocolate with too.
But my troubles didn't end there.  Dipping cake into chocolate was a disaster at first.  I just couldn't get the Wilton Candy Melts to work right so I ended up using Vanilla Almond Bark with a little bit of Americolor Soft Gel Paste in a Copper Flesh Tone Color added to it to make them look closer to the same color as the dolls.

Then, on top of that, the cake just wouldn't stay on the stick when I tried to dip it into the chocolate.  The weight of the chocolate just tore the soft cake right off the stick!  The cakes were chilled cold but it didn't matter.  So basically, I had to dip the cake ball into the chocolate and let it sit still while I spooned the chocolate up and around the pop and with the same spoon, I scooped the pop straight up to lightly twirl and tap off the excess on the side of the bowl.  I then let them sit over a piece of parchment paper using an egg carton to hold the sticks up at an angle.


Originally I wanted the sticks to be on the bottom of the cake pop so that I could stick them into a block but the cake just wouldn't sit straight and it just wanted to break and fall apart - errrr!  Frustration upon frustration but with a little improvising, they actually turned out cute laying off to the side.  I am not a cake ball/pop maker and I bow down to you all that make these often.  With some practice, just maybe, I'll get it down right.

And to the decorating part.  I tried making the doll hair by piping chocolate but it just didn't look right.  I wanted their hair to look like THEIR hair as close as possible.  So I tried to pipe royal icing in layers but that was worse so, in the end, I tossed out the piping bags (I don't like piping much anyways) and pulled out the MMF and did what I was most comfortable with...decorating with fondant.  I love how they turned out!  Although each doll took an average of 20 minutes to decorate, it was worth it in the end.

Spot Splatter Splash Lalaloopsy
How to:  Roll out the MMF into a long rope, slice it up in varying lengths, lightly score each piece a couple times then with piping gel, glue them onto the cake pop.  Piping gel sticks really well to chocolate - water won't work.  


Pillow Featherbed Lalaloopsy
Use a round piping tip to make the eye balls - a larger one to cut out the circle and a slightly smaller one to make the impression inside.  Then with a toothpick or a thin tool, cut out the holes inside the button.  I also used the round piping tip to cut out the cheeks with and painted the mouth and lashes with a really thin paint brush with black AmeriColor Gel.

Crumbs Sugar Cookie and Mittens Fluff 'n' Stuff Lalaloopsy's
The assortment:  Their names from front left to right: Spot Splatter Splash, Jewel Sparkles, Pillow Featherbed, Dot Starlight, Mittens Fluff 'n' Stuff, Crumbs Sugar Cookie, and Bea Spells-a-Lot
(they were each tied up with pink ribbon later)
By the time I finished decorating and bagging the 20 cake pops, it was 4:00 a.m. and I still had the cake to cover and decorate.  So, this is the only photo I remembered to take but at least it shows you the basic structure of the cake topper.

There's a Popsicle stick inserted into the cake ball then over that is a thick boba straw that ran the entire height of the cake and right up to the bottom of her head to help support and hold her up.
The head of the topper is mashed up cake and about 1-3/4 inches across.  It was then covered over in a 50/50 mix of modeling chocolate and MMF.  Her clothing was built in layers of ruffles with gumpaste since by the time I started making her, the sun had already come up, the birds were chirping outside and the party was about to start in a few hours - I needed it to dry fast.

And here she is all completed...

Blossom Flowerpots Lalaloopsy
Note her toes...all the dolls toes touch so I had to make her toes touch too =)

And the trees are stuffed with marshmallows to make them look puffy.


I also incorporated her name into the label - hah-hah!  My daughter now wants the same theme for her 5th birthday next month (there goes the girlie pirate theme out the door).  But, I'm looking forward to making these again.

And I did get some sleep that morning...all 2 hours worth =)  My sister-in-law did make me one of her delicious cups of coffee that helped me get through the day.  The things we go through to make cake I tell ya!  But seeing the joy in the kids faces and their eyes light up is so worth it.


See another Lalaloopsy Themed Cake here:
Lalaloopsy Cake and Dessert Table (Toffee Cocoa Cuddles)


Lalaloopsy Cake & Dessert Table - Toffee Cocoa Cuddles

$
0
0

My daughter's 5th birthday cake - she is crazy about all things Lalaloopsy with her most favorite doll being Toffee Cocoa Cuddles.  I think the dolls are a little weird with their huge plastic heads and tiny bodies but they do have cute names and stories of what they're made of behind each one of them.  Such as Crumbs Sugar Cookie (made from pieces of a baking apron), Spot Splatter Splash (sewn from a painter's coveralls) and Ember Flicker Flame (made from a fire fighter's uniform).


As for her favorite one, Toffee Cocoa Cuddles is "sewn" from pieces off a chocolate box and likes to give hugs and all things sweet.  Plus, she has a chocolate lab that has a piece bitten off his ear - how cute is that!  

If you're looking for some really cute Lalaloopsy invitations, check out Lala Heaven's store on etsy.  You give her your info, she sends you the digital file and you print them on your own printer and paper - convenient, inexpensive and oh sew cute!


I wanted to create a table setting for "Caitlyn's Sweet Shop"with lots of sweet treats for the party guests to enjoy - something I had never done before and with seeing so many pretty dessert table setups over the Internet, I really wanted to give one a try.  But boy!  After all the prepping and getting things together, I ran out of time and didn't get all I envisioned made and on it.


A Lalaloopsy inspired dessert table
My 8 year old son helped make the banner on the wall out of foam cutouts found at a dollar store.
Button Plates were inspired by Pinterest:
Lalaloopsy Party Button Backdrop on Hostess with the Mostess
another Pinterest find:  Fabric Flowers by Bete Bazzi on flickr
I bought an assortment of fabric and cutout circles using a play dough lid as a template =).  Stitched up some buttons for the centers, glued a 1/2 inch felt circle to the back and sewed hair ties to them.
I then tied them up in pairs and put them in a heart shaped bowl for the girls to pick from for their goody bags.  These turned out so cute.
Chocolate Cake Pops
I also made the button monogram in the background and hope to hang it up in her room soon...once I find the bag of picture hangers in the garage somewhere =)
Some candy jars...I printed out images of the dolls off the Internet, cut them out using zig zag scissors and attached them onto a glass jar wrapped in ribbon.
more candy jars.... I also had a jar with clear bags and ties for the guests to fill their own goody bags to take some sweet treats home with them.
I love the Candy Topiary inspired again, by Pinterest:
Take a foam ball, stick Dum Dum lollipops into it (it took an entire large, 180pc bag of Dum Dums) and stand it up on either a candle stick or like I did, stick a dowel wrapped in ribbon into it and stand it into a flower pot.  The ball is really heavy so I stuffed a bunch of heavy stuff into the vase to support it (there are a couple bags filled with rice, a foam block to help hold it up straight and a roll of this heavy, industrial tape I found in my hubbies tool box - pretty much anything that would fit and support the heavy ball and keep it from toppling over)
a game for the kids - Guess the number of M and M's in the jar.
Winner got to take the jar home....Congrat's Ally!  That's Crumbs Sugar Cookies little sister (Sprinkle Spice Cookie) on the label and she has a smudge of chocolate on here face - lol!
and some mini Chocolate Cupcakes topped with Raspberry Italian Meringue Buttercream
and one of my most favorite treats, Lalaloopsy Cake Pop Favors
I made the tags in photoshop, zig zag scissors to cut them to size and then punched holes in 2 corners to slide the popsicle stick up through.


For the cakes design, I pulled some features off the doll's outfit - such as the stripes along the side of the cake matched her sleeves and the loops below the stripes matched the loop design on one of the layers of the skirt.  My daughter specifically asked for hearts along the cake so I did the top trim in hearts and they actually turned out really cute that way.  I was also inspired by JessiCakes design and used her technique with the stripes as shown here on her blog:  Maddie's Fashion Birthday Cake by JessiCakes.

Her head is made out of a cake pop and the body is decorated in gumpaste and MMF.
It was 4am by the time I finished her up and I had to leave the polka dots off her dress to sneak a couple hours of sleep before having to get the entire house in order and lalaloopsy cake pop favors made - yeah, talk about last minute.

before being wrapped up into favors
To see how the figurine and the Lalaloopsy Cake Pops were made, take a look at my 1st Lalaloopsy Cake post found here:  Blossom Flower Pots Lalaloopsy Cake and Cake Pops
and to the best part...getting to cut and eat the cake
(no worries - I was standing right beside her keeping a close eye on her)
Cake is covered and decorated in MMF
Momofuku Milk Bar Cake filled instead with Raspberry Meringue Buttercream
8 inch round (6 inches tall)
All in all, her party turned out oh, sew sweet =)


A Mad Hatter Tea Party (and Mad Hatter Cake #3)

$
0
0
Oh dear, here is one cake that I didn't get around to share with you all from last May - A Mad Hatter Hat Cake with a modeling chocolate figurine of the birthday girl.


A chocolate cake filled with strawberry Italian Meringue Buttercream
and covered in Chocolate Ganache dusted in green, brown and gold dust
Last May we made the 6 hour drive to San Jose to spend Easter with my cousin and to also help with her daughter's 10th birthday party.  It was the most amazing Mad Hatter Tea Party.


the girls huddled in front of the cake while eating some treats =)
This was the 3rd Mad Hatter Hat Cake that I've made and if you would like to see them, check out my previous blog posts here:


We also made a bunch of decorations to top the cupcakes with...
- Stacked teacups which I later filled with chocolate ganache
- Mad Hatter Hats with her birthdate
- Clocks with her birth time
- Eat-Me tags
- Ribbon Roses
- Clubs, Clovers, Hearts and Spades
- and butterflies


The chocolate cupcakes were frosted with a swirl of purple and pink Italian Meringue Buttercream and topped with an assortment of decorations.


We also made cake pops and skewers of fruit and placed them in tall vases stuffed with colorful tissue paper.


My cousin did an awesome job with the table setting:  A couple unique tea pots and a different teacup for each setting - not one of them looked like another...it was perfect for the theme.  She also found some really colorful and bold plates, cups, napkins and little trinkets to make for a super colorful and perfect tea party.  I went overboard tying a bow onto anything that could hold a bow (I loved the red/black/white printed ribbon) - it's even up around the windows and wall decor too =)


She even setup a table for the little ones.


And the doily lace trimming around the cake stand is a paper border that my cousin had bought a while back.  It came precut and folded up inside a little packet by Martha Stewart.  I attached it to the side of the cake stand with some double sided tape.  I loved how it dressed up the stand - so simple too.


We had all hands were on deck from family and friends in putting this together and it turned out quite lovely.  An incredibly beautiful birthday for an incredibly beautiful girl.

Rice Krispie Sushi Treats

$
0
0

Sushi anyone?  I love sushi and I'm was so glad that we got to eat real sushi after making these - got my sushi craving satisfied...at least for the moment!

It was the night before my father-in-laws birthday and my husband and I were talking about what I should make.  For the past 3 years, I had created a tennis themed cake (Tennis Racket, Tennis Court, and last year, a Tennis Shoe) and although I had originally planned on making another tennis themed cake, I really didn't feel like it.  We were going to a sushi restaurant the following evening to celebrate his birthday and my husband thought it would be really nice to surprise him with a sushi cake or cupcakes instead.  It was late in the evening and we just had one of the hottest days of the year and baking, was not one of those things I wanted to do in the midst of the heat.  And I thought (a light bulb moment), why not make them out of rice krispie treats (RKT), they're his favorite anyways.

I quickly gathered up all the stuff and stayed up late making these.  Big pat on the back for creating such a neat treat at a short notice in the middle of the night with no planning, baking or prepping for - whoo hoo - SCORE!  And dishes...aside from the bowl and spatula used to make the rice krispie treats, my sink was empty and not an aftermath of a mess in the kitchen to clean up (well, a tiny mess on the dinning table where I worked on these) - I LOVED it!  I am one of those that really hates the clean up part of cake-ing and would rather decorate more than anything.  And when each cake averages 15 hours to make plus weeks upon hours worth of design and planning, it was such a nice change to be able to make something that didn't take much thought and planning for.

RKT and Fondant:  Candy Sushi Cut Rolls
(ooo, bad lighting with this one - used my cell phone)
The first thing I made were the cut rolls.  I made them like your would normally make a regular roll of sushi but instead of using rice, I used rice krispie treats and stuffed the inside with red vines, marshmallow ropes and some homemade mango fruit rollups (pretty much I grabbed what I had on hand that would work).  Rolled it up tightly using a sushi mat then cup them up into 1 inch circles.

Making Nori (seaweed)
To make the Nori (seaweed wrapper), I took a crumbled piece of foil and stamped it along a thinly rolled out piece of dark green fondant (the little square at the top of the photo is an actual piece of nori that I used for reference and later ate up...umm umm good).

I've made some sushi before at home and there are a couple websites that show you how. I used the same technique to make these:  It works just the same as if making them with rice.  Be sure to keep your hands greased up with a little bit of shortening to keep the RKT from sticking to them.


Here are the Ikura (Salmon Egg) Sushi.  I rolled out little balls of orange fondant and painted them with piping gel thinned out with vodka.  I layered on colors of yellow, orange, red and white to give them a shinny, almost transparent, appearance.

RKT and Fondant:  Ikura Sushi (Salmon Eggs)

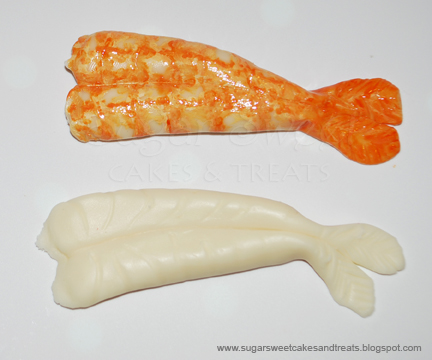
One naked shrimp and one dressed up with the 1st few layers of coloring

For the shrimp, I hand sculpted them out of white fondant, scored it a bit then painted it over with a mixture of piping gel thinned out with vodka in layers of yellow, white, orange, and red.  I kept going over it in layers and layers of colored piping gel to build up the texture found on shrimp.  They were then laid over the RKT (I used a little bit of piping gel under the pieces to help them stick a little to the RKT).

RKT and Fondant:  Shrimp Sushi
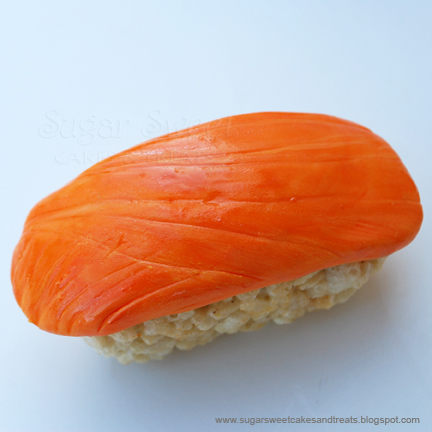
I did the same thing with each of the other sushi pieces:  hand molding them, scoring them, painting them over in a variation of gel colors and piping gel thinned out with vodka.
RKT and Fondant: Salmon Sushi

RKT and Fondant: Tuna Sushi

RKT and Fondant:  Tamago Sushi
To make the Tamago Sushi (egg custard), I rolled out the fondant just like you would make the real thing then painted in some highlights with egg yellow and white gel colors.


Once I had everything made, I didn't know what to use to display it on.  It would have been really nice to make a bento box but there was no time.  As I dug around the house, I spotted a bamboo steamer basket - it worked!  It also had a nice lid to hide the sweet goodies from everyone =D

And again, I'm craving for some sushi...


Bumble Bee Baby Shower Cake and Cupcakes

$
0
0

A few week ago, I got to make such an adorable cake for my Dad's friend.  I was given a picture of the invitation and given free reign to do as I wished for the cake and cupcakes - LOVE IT!  My favorites cakes are always the ones that I get to design and create and it's, for the most part, a total secret until delivery.  Type A and OCD-me would go insanely crazy if you were to do this to me, but when it's the other way around, I thrive on the unknown and love the surprise factor.  But, I do spend hours upon hours sketching and contemplating the design for days upon days too and usually, well, nearly always, change up something about it during the process.

The invitation design is so cute and one that you can find on Etsy by Note-able Chic.  I fell in love with the invitation and was completely inspired.

Baby Shower Invitation by Note-able Chick (Etsy.com)

I made 2 dozen cupcakes and a 6 inch round cake to match the invite.  There was so much involved with making everything for the cake and with staying up late (into the wee hours of the morning) working on it, I didn't get a chance to take photos of each step but here are the few that did make it into the camera.


Making the Marshmallow Fondant (MMF):
1) To make the Yellow MMF, I used Americolor Electric Yellow Soft Gel Paste
2) To make the Black MMF, I used Semi-Sweet Chocolate Chips and AmeriColor Super Black Gel Paste.  Follow my steps HERE on how to make MMF using Candy Melts (super easy to get dark colors with).  You can use Black Candy Melts too but it also works with using any type of brown chocolate.  If you really take notice, the Black Candy Melts is really a dark brown so don't fret if you can't find any.  Any brown chocolate will work.


The Baby Carriage:
Cake Fixation has a lovely tutorial on how to create the carriage that you can follow HERE.  So I basically followed her instructions and then made my own modifications.  For starters, the piece of Styrofoam I used was very soft so I ended up taping it a couple times in shipping tape to keep in all together and since I couldn't "stab" the 18 gauge wire into it, I taped up all the wiring around the base of the stroller using lots of tape all over the place to make sure nothing moved and everything was secure and in place before covering in fondant.

Baby Stroller structure - all taped and secure.
I covered the entire stroller with back MMF that I attached to the stucture with piping gel.  I then added the stripes separately using Jessica Harris' (JessiCakes) technique found HERE.  To get the perfect shape I needed for the canopy, I lay a piece of paper over the canopy and outlined the shape and used it as a template (see the polka dot piece above, it was sort of an "eye" shape).


To get the polka dots on the canopy to look smooth, I added the yellow dots onto the black fondant, then rolled it out flat before trimming it to size and attaching it to the stroller with piping gel.


The flying bees are sitting inside coffee stirs inside the cake.

The Wheels:
I cut out the tire ring using 2 round piping tips close in size (1 to cutout the outside, another to cutout the middle).  I then added the spokes so that they fit snugly inside the tire ring and punched a hole in the middle with a #1 piping tip.  Brushed it all over in a thin layer of water front and back a couple times throughout the evening to make sure the MMF melted and fused to each other so they wouldn't come apart on me once dry.  You could also use gum-glue or tylose glue for this but water works fine too.
The Finished Stroller:
I painted the legs and handle with black gel colors and then bent the bottom 1 inch of the stroller legs so that they pointed straight down into the cake and not at a 45 degree angle.  Since the wires were not long enough to support the stroller securely, I pushed coffee stirs straight down into the cake and wrapped up the bottom part of the wire with an extra layer of floral tape to make them thicker and fit snugly into the coffee stirs - the stroller didn't budge and wasn't going anywhere:  It was as snug as a bug!

I then attached the wheels to the sides of the stroller legs using black royal icing and added the little baby head and hands.  Notice, I added lashes and a red bow to the baby to make it girlie vs. what the actual invitation had (all the little details really do make a difference).

Bumble Bees:
I made a couple bumble bees out of fondant (mixed the MMF with some tylose) and lay the bees with wings over various piping tips to dry so that they would have a natural curve to them.  Used thin wire wrapped in floral tape for the antennas that I later painted with black gel colors.


The wings, once dried, were painted over with piping gel that I thinned out with vodka and sprinkled with Rainbow Disco Dust.  I also brushed the entire body with yellow luster dust.


Damask Toppers:
This was my very first time using a stencil and I was honestly stressed out on how I was going to do black royal icing over white fondant - it's so unforgiving and unfixable if it doesn't work.  So, I Googled for help and found that Lesley from Royal Bakery wrote up the most informative tutorial on how to Damask a cake.  See it HERE through her Facebook Page.  The stencil I used is by Designer Stencils (link below).  I did practice on a couple pieces of fondant first before attempting it on white:  Roll out the fondant, rub it lightly with shortening to help the stencil stick to it (and help seal the stencil tightly against the fondant) then spread black royal icing over it, scrape off excess, carefully lift stencil off, allow to dry for about 10 minutes then use a round cutter to cutout the topper with.  Phew!  They turned out so lovely and I love the contrast between the black and white.
Here is the link to the Damask Stencil I used:

Black Royal Icing:
To get the royal icing really black, I always make it at least 1 day ahead to give it time to mature and darken.  Make your Royal Icing...
1)  Add a couple drops of AmeriColor Super Black Gel Paste

Black alone has a slight green shade to it and the burgundy helps remove the green while blue helps deepen the black.  Hope that makes sense.  It took some experimenting but this works for me every time without fail.


Rather than repeat what other great Cake Decorators have done already and explained so well, below are some links to some tutorials you can check out and also a quick recap on everything I did...

Cupcakes:
1) Damask pattern made with, Designer Stencils Damask Cake Tier #2 Cake Stencil.  Used Royal Bakery's Facebook tutorial to find out how to use a stencil.

2) "baby" stamped lettering made with, FMM Lower Case Block Alphabet Tappit Cutters Set

3)  Handmade Bees - I need to make a tutorial on this one day for you all.  I tried to use my iPhone to record a tutorial but it was bad, really bad.  I need to borrow my brothers camcorder one day and make you all a real video.  It'll be a first for me and we'll see how that works out.


4) Yellow/Black stripes on the bows were made by following JessiCakes Striping Tutorial.  The actual folding of the bows was made by using Royal Bakery's YouTube tutorial, Satin Fondant Bow.


5)  Smooth Polka Dot Toppers:  I rolled out the fondant, added the polka dots to it, rolled it out again so the dots are flushed with the rest of the fondant, then cutout the circles using a Double Sided Round Biscuit Cutter.


6)  Lately, I've been flat-top-icing the cupcakes (not sure on the exact term used) and I'm loving this look.  I fill the cupcake liners 1/2 way with batter so they don't grow taller than the actual liner.  I then fill the tops of the cupcakes with buttercream and with an offset spatula, scrape off the extra frosting straight across the top of the liner.  Add a small swirl of buttercream to the middle of the cupcake about 1 inch tall and top with the toppers - I just prefer to have the toppers "floating" above the top rim of the liners.  The toppers should be made a couple days prior to allow plenty of time for them to dry flat and hard.


Cake:

1) Baby Carriage Topper made by using Cake Fixation's, "How to Make A Stroller Cake Topper" tutorial.

2)  The white bee wings and white scalloped circle on the cake were brushed in piping gel thinned out with vodka and sprinkled with Rainbow Disco Dust.  I used a Double Sided Round Biscuit Cutter for the white, round, disk on the side of the cake.  


3) The "baby" stamped lettering was made by using, FMM Lower Case Block Alphabet Tappit Cutters Set


4) Petal Ruffle along the bottom border will be a tutorial coming soon.  I was trying to come up with something different rather than leaving it plain or using ribbon or piping something around it and after playing around a bit, came up with the ruffles.  I think they worked perfectly on the cake - don't you think?


Well, that's it for now at least.  The year's almost over and hopefully, LIFE won't have me super busy so I can do a better job keeping up my blog.  I'm so sorry for being MIA for so long and thank you all for sticking by me during my absence.


Happy Holidays!  Ya know, Christmas will be here before you know it.


A Painted Curious George Cake

$
0
0


Where have I been?  Life has been busy, very busy that I haven't had time to keep up the blog or do many cakes.  This years resolution (and with it being February already), I'm going to try to post more stuff.  2012 went by in a flash and I'll post a little recap on the few 2012 cakes that were done.  I've also got the painting itch back and started, on New Year's day, to paint a mural along one wall of our dining room.  Although I had originally planned to take a couple days to complete it, it has turned out to be a unfinished project - where has the time gone already!

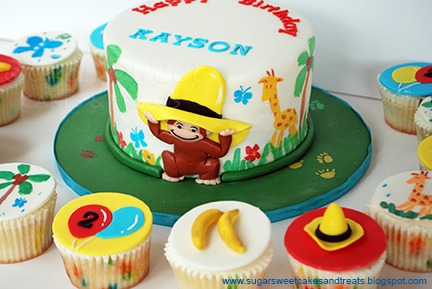
A couple weeks ago, I got the opportunity to take my painting itch and paint a little cake - at least this one was completed.  The theme was Curious George and with one of my favorite scenes in the movie being the one where he paints the room walls with palm trees, giraffes, and butterflies, I knew it would perfect on the cake and cupcake toppers for a little boys 2nd Birthday.


And how exciting was I to find my cake was picked and featured on Cake Central's Friday Faves (Feb 8, 2013) - giddy as can be!  Curious George is a cutie!

Here is a 360 degree view of the cake, a 6 inch Red Velvet covered in MMF and painted with AmeriColor Gel colors.  I also made 4 dozen Funfetti Cupcakes with matching MMF Toppers.


The inspiration for the cake - A scene from the movie - Curious George's painted wall.


Korean Hanbok Dol Cake Toppers

$
0
0
I love making these figurines and luckily, I had the awesome opportunity to make 4 of them last year.

Each figurine is made out of gumpaste and stand at 4-5 inches tall.  All the little details on the hat and shirt are hand painted in gel colors and gold luster dust.  I also add pearl dust to the clothing to give the illusion of silk cloth.  To see how they're made, take a look at one of the 1st Hanbok Dol's I made HERE:  My first Hanbok Dol Figurine.

Ci's Hanbok Dol Figurine (June 2012):  My 2nd Hanbok Dol Figurine and custom made to match the little, birthday's girls traditional Korean dress:  She stood at 5 inches tall.  I also made a couple dozen flower blossoms and butterflies to decorate her own cake with.


Maddison's Hanbok Dol Figurine (Aug 2012):  She's a replica of the very 1st Hanbok Dol Figurine I made a little over a year ago but instead of standing at only 3 inches tall, this one is 5 inches tall.


Jenn's Hanbok Dol Figurine's (Nov 2012):  2 Cousins celebrating their 1st birthday together.  Each one was custom made to match their traditional, 1st birthday Hanbok Dress.  Each is 4 inches tall.


Boston Red Sox Cake

$
0
0

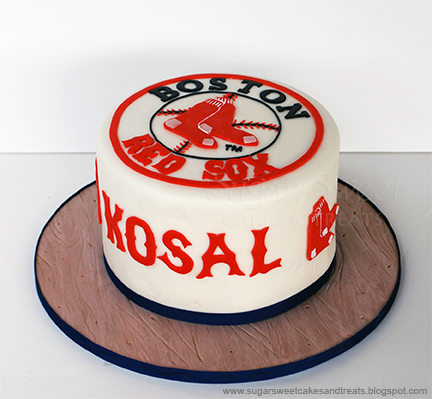
A 6 inch Boston Red Sox Cake with a wood grain board (to resemble the wood of a baseball bat).  Although simple, hand cutting the logo and font were time consuming!

I used a transfer method to get the logo just right that I adapted from Jessica Harris on how she makes perfect stripes on the sides of her cakes.


I printed the logo backwards and taped up it inside a sheet protector.  I then lightly rubbed the surface of the sheet protector with shortening to help the fondant stick.  Using a clay extruder, I extruded the red band around the entire logo, the blue outline around the baseball and the red stitches.  Using a tiny bit of water, I attached all the stitches to one another so they wouldn't move out of place (they were very tiny and thin).


For the "Boston Red Sox" font, I printed out the letters on regular paper, cut them out and used them as templates to cut out the fondant with.  There were so many angles and curves in the font that it was easier to use various piping tips to cut some of the parts rather than trying to use an exacto knife.  Once the letters were all cut, I lay then in place over the sheet protector template.  I did this a few days ahead and just let it air dry.  


After the cake was covered in fondant, I put it in the fridge for a few hours, removed it, let the cake sit on the counter for a couple minutes to get a little bit of condensation on it then flipped the logo template over the cake and carefully pressed and peeled the sheet protector off.  The little bit of condensation on the cake helped stick everything in place perfectly - I didn't have to mess with brushing water to the fondant to get it to stick.


With the cake being simple, I wanted to do something creative with the board and thought of a baseball bat.  I made the wood grain board by marbling fondant together then scoring lines with a thin tool and poking some holes in it.  I then brushed it over with a tiny bit of white gel color that I diluted way down with vodka.  It help give the board a white washed look and made the wood grain pop.


The entire cake is decorated in Marshmallow Fondant (MMF).  I did add Tylose powder to the pieces that I used to make the logo with so that they would dry harder and not be too stretchy for when I was cutting them out.

Hope you like it!

Los Angeles Lakers Cake

$
0
0

Who loves the Lakers?  We do most definitely, especially with being so near to LA.  This was created for Blake who turned 10 and loved the Los Angeles Lakers basketball team.  It's an 8 inch round, Chocolate cake filled with Italian Meringue Buttercream (IMBC) - recipe linked HERE.  It's covered and decorated in Marshmallow Fondant (MMF).


The logo was made using the same technique on my Boston Red Sox Cake (click HERE to see it).


The only difference is the "Los Angeles" font and the dashes around the "Lakers" was pipped (these were just too tiny to cut out of fondant).  In order for the purple piping to match the other purple on the cake, I diluted the MMF with a tiny bit of hot water and mixed it up really well until it was evenly melted.  I then piped it using a #1 round piping tip and a toothpick to help move each stroke into it's proper place as I tried to copy the logo as exact as I could.


Those wonderful basketball bumps...to achieve the basketball texture I used a #5 round piping tip and punched them one by one around the entire cake.  It took an hour alone to get the texture done - doesn't it look neat!

For the black striping along the sides of the cake, I first impressed the pattern on the sides of the cake using one of those tear drop shaped flower shaping tools (don't know the name for it), used an clay extruder to extrude the black "rope", then smoothed them "into" the impression on the cake so that the stripes were more flushed to the surface rather than protruding way out.

This is the extruder I like using - it comes with a clear acrylic box that conveniently keeps everything together:Walnut Hollow Clay Extruder Set


As for the base board, I was trying to achieve the basketball court flooring.  I cut out the individual panels, scored them with the thin tool to get the wood grain, assembled them on the board, then brushed it over with clear piping gel that I diluted way down with vodka that was mixed with a teeny drop of brown gel color.  The piping gel dries glossy and helps the board resemble the shiny basketball floor quite well I think.


I hand cut the Laker's Jersey's (one purple home jersey and one yellow away jersey) and added the birthday boys age to them using the FMM Tappit Cutter Set.


Strawberry Shortcake Cake with Lemon Meringue

$
0
0

A Strawberry Shortcake Cake with Lemon Meringue.  The cakes were a 6 inch and 8 inch round, Strawberry Shortcake with fresh strawberry Italian Meringue Buttercream; I even flavored the MMF (marshmallow fondant) with Strawberry Flavoring LorAnn Oil - it smelled so deliciously good!

Here's a closer look at Strawberry Shortcake.  She stands at almost 5 1/2 inches tall and is constructed out of gumpaste.  The clothing is a mix of both MMF and Gumpaste.  I dusted the cheeks with pink petal dust and also painted her entire outfit in both red and pearl luster dust that I diluted with vodka.  I hand molded the strawberries on the top of the cake and used an assortment of different blossom and rose calyx cutters for the green leaf on the strawberries.  The green petals were hand cut free hand. 


Lemon Meringue is also mostly made out of gumpaste with some of her hair and clothing being a mix of gumpaste and MMF.  Both of the figurines had one long popsicle stick that went from the middle of their heads and straight down into the bottom of the cake.  On the actual cake, I insert regular drinking straws down them, trim them so they sit flushed to the top of the cake and then slide the figurines down them for added stability.  An added bonus when inserting them this way is that when you cut the cake, you get a clean popsicle stick to hold the figurines with instead of one coated in cake and buttercream.


A closer look at the figurines while they were drying.  Note all the push pins in Strawberry Shortcake used to help hold up the hat's rim and her skirt as they dried overnight.  They work perfectly and only leave behind a tiny little pin mark.


This is such a cute photo of the birthday girl being cute and silly as the cake was being photographed (by Brian Ramsay Photography).

And my favorite shot, Serenity taking a bite off Strawberry Shortcake's face....priceless.


Photo's provided by Brian Ramsay Photography.

Doc McStuffins Cake

$
0
0
Disney has a new show perfect for little ones that want to grow up to be doctors just like Elizabeth does.  So for her 6th birthday, she wanted a Doc McStuffins themed party.  Here is the cake I made for her including some photos on how I made the Doc McStuffins figurine - she's made mostly out of gumpaste and her clothing is a mix of gumpaste and fondant.


I've been playing around with different ways to make faces and this has been my favorite technique thus far - I also used it on the Strawberry Shortcake Figurines I made a few weeks ago too.  Here are some step by step photos that I was able to capture....


I was digging through out my pantry looking for something to use for the inside of Doc McStuffins head.  I've used styrofoam balls before but kids, no matter how often you tell them not to bite into the head and that it's not edible, still manage to sneak in that bite.  I've also used rice krispie treats before but it was after midnight and I really didn't want to go through the entire process of making a tiny batch just for the head.  So alas, I found this tootsie roll pop in our candy stash - it was the perfect size!  Now the head is entirely edible except for the popsicle stick inside it - ha hah!

Step #1: Cover the Tootsie Roll Pop with fondant and mold it into a round ball.  Then add the features - forehead, nose, cheeks, and chin.

Step #2:  Cover the lollipop with a piece of skin-toned fondant, smooth out the seams along the back of the head (the hair will hide it) and mold in the features of the face.

Next Steps:  Define the nose, add the eyes, lips, and hair. Use a toothpick to add the freckles and dust the cheeks and eyelids with pink luster dust.


Note:  I like to use small sewing pins to hold up the fondant while it dries.  You can see one that I used with a yellow head for the bangs.  I also used 3 sewing pins to hold up the ruffles along the skirts bottom.  They work perfectly and only leave a tiny little pin hole behind.

Since this figurine needed to be 5 inches tall, I had to add another popsicle stick to the torso section.  I twisted the Tootsie Roll Lollipop stick around a longer popsicle stick and used white floral tape to keep it all held together and secure.  I then covered the entire mid-section with a piece of white gumpaste and built the clothing up over it.


From this stage forward, I forgot to take more photos of the process but hopefully you can see what was done.


We had cupcakes that I frosted with pink buttercream and I added a dash of glitter to make them sparkle.  I also made little pink fondant hearts and added them over some wafer cookies to look like bandaids.  The birthday girls mom setup the dessert table with little cups that held pink and white licorice candies that resembled pills and a glass canister that held large marshmallows to resemble cotton balls.  It was a super cute party!


(photo courtesy of Tuan Le)

Pin me on Pinterest (SugarSweetCakes)


Black Marshmallow Fondant vs. FondArt

$
0
0
I was at a cake supply store buying some things I needed to make my daughters Lil'panda cake and spotted a 2 lb pouch of Albert Uster's FondArt Black Fondant and thought I would give it a try.  I've been making my own fondant for a couple years and it doesn't hurt to try something new and different for a change.

To my surprise, the FondArt Fondant was more of a very dark, green.  It looked black from a distance and under different lighting but up close and right next to my homemade black marshmallow fondant, it looked green.

FondArt Black Fondant (left) vs. Homemade Black Marshmallow Fondant (right)
I'm sticking to my homemade black marshmallow fondant - not only does it look black but it tastes like a chocolate tootsie roll too.  Yummy!

I did mix them together to cover the cake with.  Workability was great, texture was great, color and taste were better once mixed with MMF.  Used alone, I don't know, haven't tried it that way yet.

Tip:  When making black royal icing or buttercream, it always look a bit on the green side or a deep gray at first.  Add a tiny drop of burgundy coloring to it and let it sit overnight and it'll darken and deepen as it rests.  For MMF, chocolate chips are already a little brown so there's no need to add the burgundy to it.

If you want to know how I make dark colored marshmallow fondant (MMF), use my recipe HERE (for tips, visit my Marshmallow Fondant MMF Recipe page).  It's super easy.  You can make any color you like; red, green, blue, and even white if you want.  For black, don't fret if you can't find black candy melts.  I prefer using regular, semi-sweet chocolate chips to make black MMF.  Using candy melts or chocolate to color your MMF with works like a charm.  Give it try.


Featured in CakeCentral Magazine (June 2013)

$
0
0
A Beatrix Potter Baby Shower Cake - The Tale of the Flopsy Bunnies


I was completely surprised to be asked if I could to submit a cake to be possibly featured in an upcoming issue of CakeCentral Magazine.  Who could possible pass this up!  Well, I almost did.  I received the invite on a day that I had gotten hit really hard with the flu bug.  I briefly read the email not thinking anything about it and went right to sleep where I stayed for 4 days fighting a high fever.  It wasn't until later that I sat down and reread the email that it actually hit me...Cake Central had invited ME to submit a cake!  Me!  Oh my! and it had to be professional photographed and submitted by a deadline that was now less than 2 weeks away.  I pondered whether I could possible pull it off while being sick all while trying to figure out what was I going to do, am I even qualified to do this, how, when, where, who, ahhhh!

The theme I was given was a Beatrix Potter Baby Shower and the book was, The Tale of the Flopsy Bunnies.  Beatrix Potter is the illustrator and writer behind the Peter Rabbit series of books.  I absolutely love her work and I was excited to take one of her stories and turn it into cake.  The design I came up with for the cake was my interpretation of the story - the top tier showed one of the baby bunnies sleeping under the lettuce plant after filling his belly up with lettuce (food coma or as Beatrix Potter called it, soporific) and the bottom tier showed farmer Mr. McGregor's window (the one the Flopsies used to peek in through) and I added mommy and daddy, Flopsy and Benjamin Bunny, walking along the farmers home.

A week went by in trying to fight off the flu and now I was on a tighter deadline.  With my head in a fog, and a flu that just stuck to me like glue in what seemed to take forever to get rid off, I was now on a mission to get this cake done.  And it never fails....Why is it that when you need something, you can't find it but when you don't need it, they're everywhere?  I had to go all over town to 3 cake supply stores to find cake dummies in the sizes I wanted.  All I wanted was a 6 x 4 inch round and 2, 8 x 4 inch round dummies!  Nothing complicated, nothing out of the ordinary.  Then, make another run to Home Depot to grab a pale of Patch 'N Paint (it's the stuff you use to spackle and patch walls with) and rolled up my sleeves to attempt prepping my first cake dummies.  Just a month prior, a fellow cake club member gave a demo on how to prep your cake dummies using Patch 'N Paint like buttercream to cover your cake dummies with, let it day a couple hours, sand it down smooth, rub in a light layer of shortening all over it and then roll out and smooth your fondant over that.

Sounds easy right?  Well, real cakes are heavy and stay put when you ice them.  Cake dummies on the other hand, are really light and move all over the place.  I rolled up packing tape to the bottom of the cake dummies and onto a board to help them stay grounded and just held the top of the dummy down with one hand while I iced and turned the cake with the other hand.  What a challenge that was!  The Patch 'N Paint is awesome and has the same texture and workability as buttercream.  It's super light weight too and dries within hours.  Just look at how neat it looks after sanding it down smooth.

A blank, white canvas....

It looks like buttercream without the extra effort and ingredients to actually make the buttercream.  I'm really loving this stuff.


For the cobblestone base, I rolled out balls of white fondant and smoothed them one by one next to each other around the board.  After it dried, I dusted it over with an assortment of 5 petal dusts to give it some depth and the illusion of a real cobblestone floor.  What's an English garden without cobblestone?


The baby bunny was hand molded out of marshmallow fondant that I mixed with Tylose to help it dry harder and faster.  I used scissors to snip the fur pattern around his body.


I cut out the lettuce leaves free hand (didn't have a cutter that was large enough for these) and veined them using a large orchid viener.  They were originally made in white then dusted with yellow and green petal colors to look like lettuce.


The larger lettuce head is what I assembled with the leaves I had made a day prior then at the last minute, I decided to add a couple small ones along the base of the cake.  I used rose petal cutters to cut these since they were smaller and dusted them the same way as the large one, assembled them and let them dry overnight.


The fondant name plaque was hand cut from a paper template I made and I added the ribbed texture on it by pressing down a skewer every 1/8 inch across it.  Upper Case and Lower Case Tappit Cutters were used for the "Baby" font.  I added 2 trees to either side of the cake and made each leaf on the tree one by one...


well, each leaf is actually a 5 petal flower molded and pinched in the middle to look like a cluster of leaves.  I wanted to illusion of leaves but without the work of having to make each and every single leaf  - cool right?


I used 5 different colors for the leaves to create some depth and made well over 200 of these blossoms for both trees.


They came out exactly how I wanted them to look.  I absolutely love how they turned out.


Mr. and Mrs. Bunny were also hand molded and I used a pair of scissors to lightly snip the hair markings around their bodies.


Aren't they just cute walking along the cobblestone path?

And here it is...3 pages in the June 2013 issue of CakeCentral Magazine (Volume 4, Issue 6).  What an honor and an adventure that I would do all over again in a heartbeat.


A special thank you to Bryan Ramsay (www.bryanramsayphotography.com) for making the time for my last minute request and for taking the beautiful photographs that made the cake magazine worthy!

We had to wait quietly for 3 whole months to find out whether the cake made it into the magazine or not.   It was torturous not being able to talk or share the photographs with everyone but now, I can finally show them off.  Hope you enjoy them.

See other pictures of the cake here:
Sugar Sweet Cakes and Treats Facebook Album
Sugar Sweet Cakes Google+ Album
Cake Central Album:  AngelFood4

I also got picked for Cake Central's Cake Decorator Highlight piece in June.  Read more about it HERE and find out a little more about me.


Japanese Beetle Bug Cake (Tutorial)

$
0
0
My daughter's friend had a bug themed party and when asked to make a cake, I jump for joy suggesting a giant bug for a cake and that is exactly what I made....a big, creepy, Japanese Beetle Bug Cake.


The beetle is sitting on a 16-inch round board and its body measures to about 12 x 6 inches.  He's entirely made out of cake and decorated in fondant.  Here are some of the step-by-step photos of the process in making the cake:


Baked 2, 8-inch square cakes plus a cupcake for the bugs head.  Cut out the base of the cake out of a cake board and used it as a template to carve the basic outline of the beetle
Basic outline of the bug carved out of cake
I used a paper template from a coloring page of a Japanese Beetle to get the features just right on the cake.  Further carved the sides of the cake into shape.
Remove the template and eyeballed the rest of the features and carved out the roundness of the bugs body
Cover in ganache and let it sit overnight to set
After it sits out overnight, I pop the cake into the fridge for about half an hour to get firm so that I can handle it better.  I propped it up over a container so that as I add the fondant details, I can wrap it up under the cake to give it a more 3D look rather than have it sitting flat up on the cake board.  I lightly drew out the details on the cake with a scoring tool so that I can get a better feel of what I need to make.  The cake does form a small layer on condensation as it comes back to room temperature and it works to your advantage and helps the fondant stick to the ganache without needing to add anything extra.
Keep adding the details on the bug cake section by section.  As you can see, the cake is propped up over a rectangular container that fit under the bug's body.
The wings were the most difficult to get just right.  I must have spent a good hour shaping them.  I then let the cake rest for a couple hours so that the fondant can harden up a bit before painting in the details.
I then painted the wings with piping gel that I watered way down with vodka: I used a mix of chocolate brown, bright yellow and white gel colors.  I also painted the body of the bug the same way using a little bit of yellow to give it some texture and dimension.  The piping gel dries up leaving behind a glossy shell.


I used the coloring page as a reference to sculpt the beetle's legs with - I wrapped up a straw with black fondant and sculpted the details on it.  I used the same technique to create the tentacles.


All 6 bug legs made and left to dry overnight.  The tips of the straws sticking out is what I use to insert into the cake.  I used sugar glue (Tylose powder mixed with water) to help hold the legs into the cake.

Once the cake was assembled, I used white royal icing to brush the "fuzzy hair" around the sides and back of the bug.

 And that's it.  Hope you like it and didn't get too creeped out by it.
Japanese Beetle Bug Cake
(a view all around)


Little Mermaid Cake

$
0
0

I just love how my nieces Little Mermaid Cake turned out!

Below are some photo's of the Little Mermaid Cake.  It's hard to see it but I did brush the bottom half of the cake in blue petal dust to create the illusion of depth since the ocean does get darker the deeper you go -it's like a subtle ombre effect.  I also made the splashes around the tail fin by ruffling up some circles of fondant, lightly folding it in half then brushing the tips with white royal icing (brush embroidery method).  I then dusted some white glitter along the tips of the fin and water splashes and added pearl dust around some of the decorations.  The bubbles were painted on really lightly with white gel color diluted with vodka and the cutter used on the name were FMM Upper Case Tappit Cutters.

All the decorations were made using Wilton Fondant - A few months ago, I bought two, 5lb boxes at Michaels for really cheap and now wish I had bought more (they were on sale plus I had a coupon that was good on sale items - rare find).  I can see why Lesley from the Royal Bakery uses it for her cake decorations - it dries up quickly but gives you time to work on it - kind of like a mix of fondant and gumpaste.  I'm liking this stuff.  I still like covering my cakes with Marshmallow Fondant (recipe can be found along the tab above) - it tastes better and works for me.

I must have watched, The Little Mermaid over a million times when it first came out on VHS (and how it ages me) and I loved Sebastian singing his songs.  So for Sebastian (the little red, crab), I modeled him singing to Ariel in his catchy, big, deep voice...."Under the sea, Under the sea, Darling its better down where its wetter, take it from me"....


I made the Little Mermaid child-like since I figured it would fit better on a cake for a 3 year old.  She loved it.....I do....and I hope you do too!


Los Angeles Lakers Cake

$
0
0
Who loves the Lakers?  We do most definitely, especially with being so near to LA.  This was created for Blake who turned 10 and loved the Los Angeles Lakers basketball team.  It’s an 8 inch round, Chocolate cake filled with … Continue reading 

Strawberry Shortcake Cake with Lemon Meringue

$
0
0
A Strawberry Shortcake Cake with Lemon Meringue.  The cakes were a 6 inch and 8 inch round, Strawberry Shortcake with fresh strawberry Italian Meringue Buttercream; I even flavored the MMF (marshmallow fondant) with Strawberry Flavoring LorAnn Oil - it smelled so … Continue reading 

Doc McStuffins Cake

$
0
0
Disney has a new show perfect for little ones that want to grow up to be doctors just like Elizabeth does.  So for her 6th birthday, she wanted a Doc McStuffins themed party.  Here is the cake I made for … Continue reading 

Black Marshmallow Fondant vs. FondArt

$
0
0
I was at a cake supply store buying some things I needed to make my daughters Lil’panda cake and spotted a 2 lb pouch of Albert Uster’s FondArt Black Fondant and thought I would give it a try.  I’ve been … Continue reading 

Featured in CakeCentral Magazine (June 2013)

$
0
0
A Beatrix Potter Baby Shower Cake – The Tale of the Flopsy Bunnies   That’s my cake featured in the June 2013 issue of Cake Central Magazine – whoo hoo! Here is a copy of the 2 page spread and … Continue reading 
Viewing all 46 articles
Browse latest View live


Latest Images